Sunday, December 12, 2010

A Snow Blanket and Sprout Time

Sunflower sprouts are a great treat you can grow yourself.
The first real big snowfall of this winter.
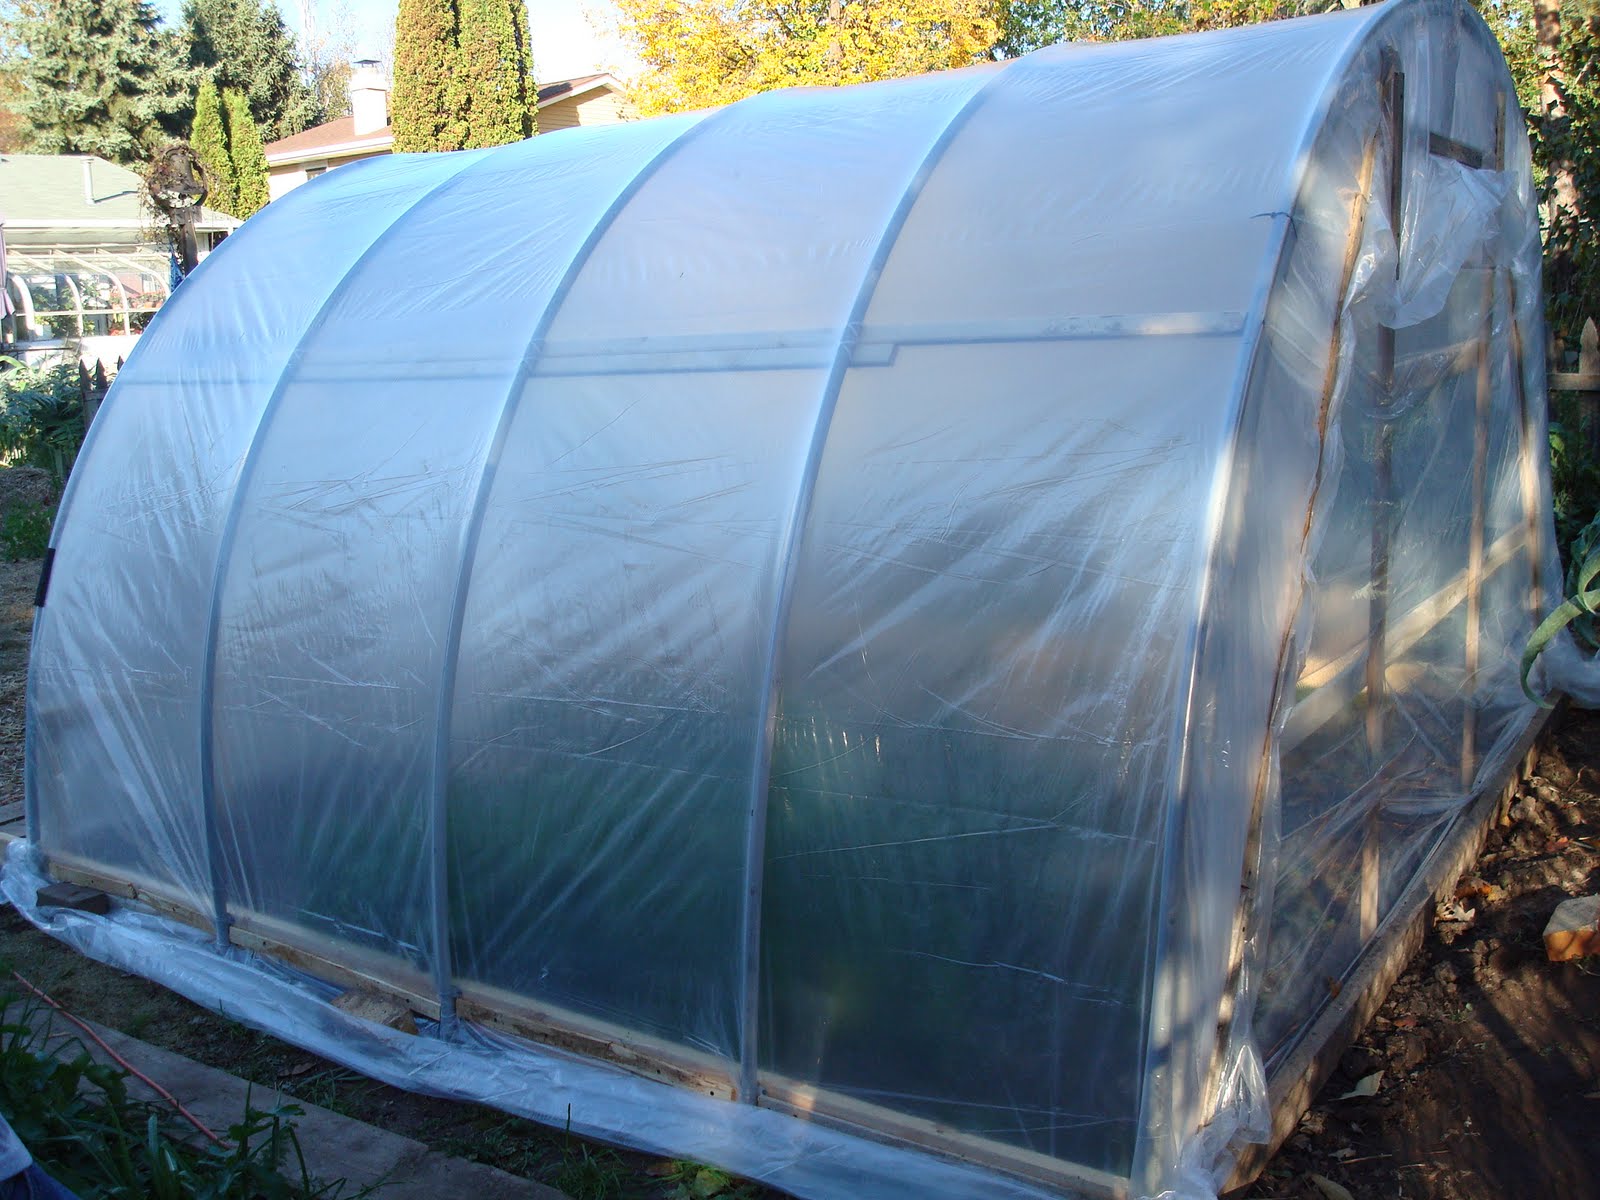
The hoop house took the storm well.
These sprouts are ready for light and harvestable in a week.

Harvest time for these sprouts.
One has to clean the seed coats off the sprouts as a fair number do not drop off.
Harvest with a knife or kitchen shears.
I clean them in cold water and then spin them dry for storage.
The roots can go on the compost pile or out for the bird to have some winter greens.

Our recent winter storm brought a white blanket to the garden and covered the cold frames so most of our harvest for 2010 is over.
However, on December 1st I harvested Napa cabbage, sorrel, and some parsley but now most of those are covered with snow. I am not too sure if I will be able to get any parsnips out of the ground this December like last because the ground is really frozen and a nice heavy snow blanket is not drifted on that patch. If snow was over them heavy the ground might warm enough for me to dig them in a few weeks. We are down the the last of the apples for one more batch of applesauce and then that harvest will be gone.
The hoop house held up real well in the storm. High winds ( 30-40 mph) did not seem to bother the plastic and the snow was blowing so much that little accumulation on the house occurred. But we still have a few more months of snow and wind to endure. The snow did pile up on the greenhouse and because the glass is old, I pulled snow off twice in this storm. I don't heat that space, but a sunny day will cause the snow load to slip off. Snow did not slip this time. The drifting as noted in the pictures, made pulling the snow off a bit easier than usual because I could stand on the drifts.
Outside gardening is over, but we are still growing. The first of the Amaryllis are showing nice flower stalks and we are forcing Paper whites. The paper whites are one of the easiest flowers to force in the house, because a bulb is like buying a flower ready to go. Three or five bulbs will make a great show for over two weeks. We have returned to growing sprouts in the basement as well. I have grown three batches of sunflower sprouts recently and let me review how I do that.
I wash the sunflower seed in water with a couple of sprays of Clorox. Afterwords, I rinse them off and let them soak overnight. The next day I drain them and scatter them in a plastic tray that does not have holes. I have been putting a small amount of potting soil in the tray before I scatter the seed. I then pat the seed on that soil bed ( less than a half inch) and mist the seed before I put a dampened sheet of newspaper over the seeds. I use a plastic dome over this and put a bath towel over that. At one time I was putting the tray on a heat mat but that just seemed to promote mold - ugh.
For the next several days I spray the paper and check for germination. Usually in three to four days the roots emerge and then you must be vigilant about water and air. Take the newspaper off and begin to give the seedlings light. I have them next to or sometimes under the florescent light bank that I have in the basement for a few plants that I winter over. Keep the growing seed mois,t and add water the the tray. In less than two weeks you will have a nice crop of spouts.
I then cut half of the tray and clean them as some of the seed coats do not fall off the cotyledons as they grow. Cleaning is in a sink of cold water and then I spin the sprouts in a salad spinner and bag them into plastic and store in the refrigerator vegetable bins. Expect a week on the cut sprouts and let the other half of the tray continue to grow and harvest them 4 to 5 days after the first batch.
Sunflower sprouts are great in salads, sandwiches, wraps, soup or just eaten by the hand fulls. They and other sprouts such as alfalfa, mung bean, radish, and broccoli are something we grow most of the winter. The key to success is constant rinsing of sprouts grown in jars and constant moisture for spouts grown in trays. By the way, sunflowers as a field crop are not treated for insects so in reality you can share the 50lb bag with the birds and still have great sprouts in the kitchen.
When you are done with the tray, toss the roots on the compost pile. The birds might find the leftovers good and if you have chickens they will appreciate the winter greens too.
Happy Gardening

Sunday, November 21, 2010

A Few Last Garden Harvests

Cardoons are great plants
Cleft grafting on apple - think about this for next spring.
Tomato grafting is an interesting experiment for the home gardener.
Cardoons tied up for blanching in October
Today's harvest for tonight's meal.

Cleaning the cardoons.
Scraped and sliced stems.
Into lemon water they go and then they will be blanched.
The cardoon dish ready for the oven.
Spinach seedlings in the hoop house that will be the 2011 harvest.
Cold frame lettuce
Napa cabbage that the slugs just love - but we harvest the head anyway.

It may say fall on the calendar but the seed catalogs have already started to arrive. This year by November 16th I had two! - Stokes again was here first but PineTree was in the mailbox too. So November catalogs mean the countdown till the 2011 planting season has begun -"Boy Howdy!" I can hardly wait.
I got to teach a class in plant grafting at Fox Valley Technical College last weekend and I was really excited about the enthusiasm of the class I had. We discussed hard wood grafting and did some practice scion cutting and cleft grafting. I brought apple watersprouts for the practice. Now would be a good time to think about grafting some different apple varieties on that apple tree in the back yard. You would have time to research your choices, learn about grafting and maybe find a class to sign up for that would make your spring grafting experiment successful. Grafting is also a way to renew a tree or save an old favorite apple from another tree onto a branch in your back yard. you can go to the May 6th, 2009 blog entries to see the grafts I put on that season. This season I did not graft any new varieties onto the trees but I think next spring I will be back at it.
We also discussed vegetable grafting and tomatoes were part of that the topic. I think that this grafting is a bit more difficult than hardwood work, but still, as a way to experiment, I find tomato grafting a real challenge. This is the activity I would like to find a class in so I will be checking the Extension sites of both Missouri and North Carolina to see what they might have as classwork next season. Both have done such classes in the past and the North Carolina site has good information about the process. This too might be good winter reading and then you can plan to try tomato grafting next season along with your apple grafting.
The garden is still producing fresh produce. Today I harvested Daikon radishes, Napa cabbage, and Cardoons. Cardoons are on the menu tonight - AuGratin style; however, the Internet shows them as a crispy fried treat too. I harvested three heads that had been tied up for blanching for several weeks. I cleaned the stalks, scraped and pulled off the tough parts and thorns, and put them in lemon water and then blanched them. I am cooking them casserole style with onions, garlic, thyme and cheese but there are many good recipes on the net -Google 'cardoon recipes' and look at the images too. This is a great vegetable and a beautiful garden plant. Here in Wisconsin they are usually an annual but with some protection I have had some return to make seed heads the second year. We also ate these immature flower buds just like artichokes which are a close relative of cardoons. Several seed catalogs have the seed - put them on the wish list for next season.
The pictures this week show some of the hoop house and cold frame plants that will hopefully survive the winter for harvest next spring. The Napa cabbage was ravaged again by the slugs but a little salt in the cleaning water and they are done for - no escargot in the salad please. As you note we are back to alternate weeks with posts during this slow growing time but with the seed catalogs arriving the thoughts of next seasons garden slowly takes form and the excitement of another growing season builds.
Happy Gardening

Monday, November 1, 2010

Drying Apples - Good Snacks

Hooray!!! The hoop house is still standing after three very windy days.
The squirrel bungee feeder - this should be fun
The wild arugula blooms late in these short fall days.
Hoop house spinach for spring 2011 harvest.
Some mixed greens sprouted in the hoop house.
The celeriac is still growing nicely in this protected environment.
Diakon radish and Nappa cabbage in a cold frame.
The garden put to winter rest with its drainage ditch down the center.
An experiment next to the house (Caution - windows do not work well for cold frames.)
The apple drying picture - coring the washed fruit.
I slice thick as you can see.
Into the lime or lemon water to prevent browning.
Then they get drained before going onto the trays.
Space the fruit so that its flat on the tray - try of avoid overlapping.
A dusting of cinnamon on some of the trays for an experiment.
The fruit in the foreground is dried red grapes - they are really good - nothing on them at all.

We had a barometric pressure reading last week of 28.88 - some sort of record and the winds that followed that low pressure were intense. Luckily for us the hoop house is somewhat protected by a few trees in the neighbor's yard and I think the large spruce tree helped deflect some of the wind. Anyway we still have a hoop house. I took precautions and unplugged the automatic venting system for the greenhouse so that the winds would not destroy the vent as wind has done in the past.
The spinach and other greens are sprouted in the sheltered environment of the hoop house and so with some luck we will have spinach in March or April of 2011. The celeriac plants have a mulch of straw around them as I want to see if they will keep longer and be useable later in the season as they did not grow real large. I did not plant all the space in the hoop house but left enough room for Arugula and early lettuce plantings in the spring. One needs planning for food.
The garden has been rototilled but this season I do not intend to plant a cover crop of winter wheat for several reasons - the large amount of straw that I used as mulch last season has been tilled into the soil and because of the lateness of the time I am really not sure I can even find seed. So with that in mind the garden will be open this winter. I did ditch to space because I want the rain and snow-melt to drain through and thus I have a ditch running the length of the garden. I put straw at both ends to slow the water down and stop any erosion of my soil. The only things left in the garden are the parsnips for next year, some salsify as a root crop test, the Daikon radishes in a cold frame and the Nappa cabbage in the cold frames. The Daikon radishes are real sweet for this late in the season. One other frame has spinach and lettuce inside hopefully for next spring.
With all the apples harvested I have been drying them. Dried apples are easy and a home dehydrator is the quickest way to get the job done. Ours has 6 trays that I fill and the fruit dries overnight. Our process is to clean the apples and usually not peel them as they have all been in bags for the growing season and have no pesticide residue on the skins. Plus, I can't prove it, but I feel they skins are more tender than on unbagged apples. To keep them from browning, I put the apple pieces in a water bath of lemon or lime juice - usually one lime for a couple of cups of water. The cut up fruit is dipped in the water and then put in a strainer to drain and then put on the dryer trays. This year I tried dusting a few of the trays with cinnamon - we like them. The dehydrator is set for "fruit" and if I fill the trays in the afternoon they are ready to bag up by the next morning. We had someone calculate our electricity cost for this process and it came to something like 25 cents per 6 trays of fruit. When the apple pieces have dried, I put them in baggies and store them in a cabinet over the ovens. Certain people here really love dried apples so they seldom last the whole winter. I have reconstituted them with hot water to use in cooking but mostly they get eaten as dried fruit.
As you see with the season winding down, so have the entries. I looked at the statistics for this blog and was amazed to see the distant places that have located us and the large number of hits the blog has gotten over time. I sure hope we have helped you in some ways and we do enjoy sharing our garden and techniques with everyone.
Happy Gardening

Sunday, October 17, 2010

New Hoop House

The new hoop house is up and planted with spinach, lettuce, radish, mustard and kale.
Rebar rods, 'U' galvanized clamps help secure the PVC conduit to the 2x4 frame.
I used two clamps to secure the PVC to the base.
I used the glue that is labeled for this PVC conduit.
This picture and the next show that I brought the base plate into the first hoop.
I had to do that so that I could build the frame for the front end.
The back end is another hoop plus a wood frame. I think I like the front better.
Both ends done and ready for a door and covering.
Because the house goes down hill the door opening was not square - kind of a challenge.
The plastic is secured at the base with lath strips screwed into the base.
Lath also help secure the covering to the front and back making a nice closed space.
I planted spinach in three rows.
Instead of seeding the whole row I used a dibble and space spinach clumps 2-3 inches apart.


This weeks mystery plant was a surprise to me too as I have waited all summer to see this....

The new hoop house, season extender, is up and planted. The total cost is somewhere less than a $100 as I did have some materials left from other projects that I used. I got gray PVC conduit instead of the white plastic because it cost less than the other pipe and I liked the fact that I did not have to buy another fitting to stick them together - the conduit has male and female ends for gluing purposes.
I used the ten foot conduit and only cut about 6-7 inches off each end to make a hoop that was 74 inches high and fit nicely between my 2x4 base frame. I used rebar rods and galvanized 'U' straps at the base to secure the hoops to the frame. I used 1x2 furring strips as side and top braces and attached them to the pipe with zip ties. The ends were each different as I wanted to see which seemed to work best for closing off the hoops. I think I like the front closure method better than the rear closure for two reasons - first, the front does not need another piece of pipe and it was difficult to get the bend correct to fit under the existing pipe at the rear; second, the front seems more stable and has more staple points for attaching plastic. Both ends are from other Internet sites that show this kind of plastic hoop house.

(Look at them here: doorgarden.com/10/50-dollar-hoop-house-green-house and also at www.albertahomegardening.com/how-to-build-an-inexpensive-hoop-style-greenhouse )

I used one 20ft x 25ft sheet of 3 mil plastic to cover the house. What I liked was that this plastic sheet allowed me to double the covering - (not planned but it just turned out that way - what luck) - so I think the structure will better withstand snow and maybe allow the snow to slip off better. The plastic was secured to the base with lath strips and dry wall screws. Snow was the biggest problem with the old structure I had - snow stayed on the roof and had to be pushed off. We will just have to wait and see what winter will bring to this season extender.
So to summarize - the new hoop house is a 10 ft x 10 ft space with 2x4's as anchors for the two pieced PVC conduit hoops. The braces are 1x2x8 and the end boards are 1x3's. The door is also 1x3's and is covered with a sheet of heavy plastic I have been using to make apple labels. A friend gave me several sheets of this stuff a long time ago and so out of the basement the heavy plastic came to serve as a nice door for the hoop house - (Thanks Linda L.) The skin is a 20x25ft sheet of 3 mil plastic and the ends are covered with pieces from an 8x25 sheet of 4mil plastic. The whole structure was secured with zip-ties and drywall screws.
The only thing I forgot to do was to paint the PVC as some discussion says the plastic against plastic seems to degrade. So I put duct tape on the hoops after the fact today and will wait to see how that works.
The space has some plants already in place - celeriac and some greens but today I planted spinach, lettuce, greens, and some kale seed I had left from last year. I also left some space for arugula and lettuce for a spring planting. Hopefully the weather will hold and I will get some germination in the next two weeks. The spinach I planted in the cold frame a while ago is sprouted and the lettuce transplants have perked up too.
Along with finishing and planting the hoop house I got some of the other fall jobs done. I drained all the rain barrels; dug the bonsai into their winter locations; picked the apples - mainly because the robins are attacking the fruit through the bags. I had a number of apples that were really pecked badly and that allowed the German wasps to get on them too. So the best solution was to pick them all. I pulled all the tomato posts last week and hope to till the garden soon.
Happy Gardening