Sunday, April 26, 2009

Making a Planting Board

The Planting Board in Use


Rain, Goldfinches in summer plumage, and Dandelions all mark the advancement of our spring. These April rains will green the grass and trees. The birds are in a nest building flurry taking cotton and twine that I have hung in the apple trees for them. At a Master Gardener program this week I learned that Ruby-throated Hummingbirds are already back and now would be a good time to hang out the feeders. The speaker indicated that "cane sugar syrup" is their favorite in a mixture of four to one ( H2O/C6H12O6) Shortly the Baltimore Orioles will be back too, so now is the time to watch for grape jelly on sale at the store and stock up. Its amazing how much the birds will eat and not just Orioles, I have seen Grackles and House Sparrows taking their share too.

The garden is really wet but in advance of the rain I got some much needed clean-up done and some planting as well. Now it will be a while before I can get back as the soil is really drenched and my heavy clay will not tolerate walking on or working in - easy to make bricks that way.
I sorted the small onions that I saved from last years crop and sized them for planting. I had some small seed grown shallots, some Cipollini "Gold Coin", and what look like Red Long Of Tropea type. I set these bulbs out in short rows (see photo) and then inter-planted with lettuce. The transplanting video briefly shows close up the lettuce plants planted in the spaces between the onions. I planted half a flat into this area and the rest of the plants went into the spaces between the developing rhubarb plants that were grown from seed last year. All this is very typical of how we plant. Our space is a premium, so getting the most out of any planting is my goal. The lettuce will be harvested from the space before the onions really need all the room. The onions are also planted close so that I can harvest and thin at the same time.

I inter-planted the onions with four types of lettuce transplants - Simpson's Elite, Derby and Winter Density, along with a few plants of Tom Thumb a nice small bibb type. Most of these transplants look thick but I did not thin them on purpose - plant clumps and you have a measured amount for harvest.

The harvest of spinach continues as well as the first mini-radishes. Spinach has sprouted in another cold frame and that frame has two plantings spaced two weeks apart to stretch that harvest. The sorrel is moving along and so are chives. There are now many goodies to add to morning scrambled eggs. Tarragon is up but not enough to start a harvest.

Seeds are a wonderful thing. I got some "White Star"zinnia seed at a lecture about seed viability two years ago. The seed was dated 2004. Last summer I planted some and it grew so I tried it again this season and it grew again! and still better than 50% germination. So if you have seed from other seasons give it a try. You might be very pleased.

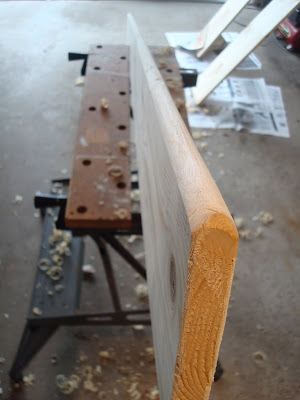
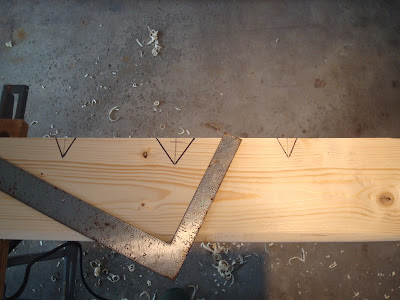
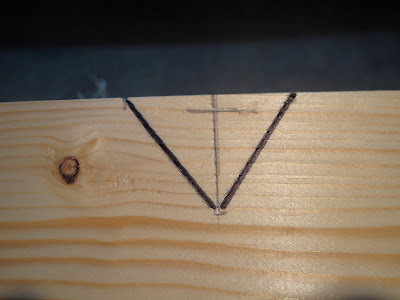
This week's garden project was to make a new Planting Board. This is, like my cold frames, something I constantly use in the garden. You will need a 1inch by 6inch by 6 foot pine board.
I round one edge ( see pictures) to act as a furrow maker. I use a small hand plane to do the job. If you are good with a saw you could work the edge that way too. I sand my results and then mark off one foot and six inch spaces for my planting notches on the opposite side. I do not make these real deep as that weakens the space in between and might cause that part of the board to break off. Measure the large notches 2 inches long by 1 1/2 inches deep; measure the small notches 1 inch long by 1 inch deep. Saw out your notched and you are done. Use the photo set for a reference. I use a 6 foot board because I seldom make a row longer than twice that dimension. I prefer short rows and multi repeat plantings to get the longest harvest of a crop. The board helps to plant row crops like beets and carrots along with other plantings like tomatoes and peppers. A planting board is a great garden tool and you can make one for less than $5. I don't treat the board, I just let it age with use. The one in the photo is probably four or five years old. To borrow a phrase - it's a very good thing.
Happy Gardening

Transplanting lettuce seedlings

Sunday, April 19, 2009

To Thin or Not

February Gold Daffodils
Parsley un-thinned
Parsley Thinned
Micro-greens
Visions of Boiled New Potatoes


After a long dry spell some April showers have come and we certainly need the rain. The blooming daffodils mean the Ramps ( Wild Leek - Allium tricoccum) are up in the woods and it's time for a wild harvest. Always remember to ask to harvest on private land and never over harvest. Besides a good handful of Ramps will probably be enough if you are the only one that eats them - they are strong and make one a bit odoriferous, rather like good garlic.

The warm sunny days have really caused seedlings to grow and now is thinning time. I like to do thinning before the first set of true leaves appear. That way I can transplant later if I run into problems. That has happened to several packs of parsley. The parsley was thinned at two plants per cell. Yesterday a couple of nine packs suffered from drying out past the point of revival so I will transplant from other packs that still have two plants per cell. This is really a backup system. Leaving two plants per cell and thinning early allows for transplanting as the first set of true leaves appear. Expect some problems with seedlings during the growing season and think ahead as to solutions. Sometimes that comes down to re-seeding.

The video this week shows thinning. I am thinning lettuce at one or two plants per cell. Some lettuce transplants are not thinned as I plant them into the garden that way to allow for clump harvest of lettuce. Bibb and Romain and other head varieties are best thinned but leaf and varieties like Simpson Elite I like in clumps because they are harvested as young leaf bunches.
The tray of lettuce seedlings will be thinned and then moved outside into the cold frame as lettuce is much happier in a cool environment.

The peppers and tomatoes are at the same point of thinning. Some have been thinned to two plants per cell and as the first true leaves appear the strongest, most vigorous, and best plant of the two will be kept. Sometimes that plant is not the tallest but a plant with good color and a thick stem. I am not looking for tall pepper or tomatoes; I am looking for sturdy plants that will continue to grow vigorously as they are moved into the next pots before June planting out.

The key to thinning is pick the seedlings that you want to keep then pull the rest. That is why I use a tweezers. Move the keepers aside and pull the others. Early in the process the roots are not developed well and the seedlings even close together will separate and come out easily. It is best not to do this task with dry soil; so water and then thin. Be ruthless, the survivors will be happy and they will grow nicely for you.

I have included pictures of the micro-greens trays that have really appreciated being outside and will soon be ready for harvest. We are close to the point of not needing store-bought leafy vegetables. Spinach, arugula, sorrel, and lettuce and the micro-green trays are all available for cutting and the first seeding of lettuce will soon be sized for transplanting into the garden so we are already on our way.

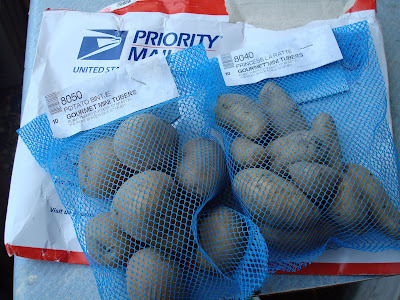
This summer, potatoes return to the garden space and the first of them have arrived in the mail. They are to be part of a experiment with tower growing. For the last two summers, we have tried sweet potatoes with poor results. Our ground is too heavy, and I feel, too cold. Even in soil bags growing in the shelter of my small greenhouse our success was poor. So, we have returned to regular potatoes and will experiment with growing them again but will try growing potatoes vertically to save on ground space. I will keep you updated on that endeavor.

Happy Gardening

A Thinning Method

Sunday, April 12, 2009

Easter Harvest


This week saw the micro-greens moved outside into a cold frame even though the nights have been close or below freezing. The crop growing in the trays will do better in a cold frame than in the greenhouse. Seedlings are sprouting daily. The first peppers are up and the second seeding is in the ground. The first seeding of tomatoes are warming on the heat mats and the first tray of lettuce seedlings have sprouted and been thinned. They too are soon to be transferred outside to the cold frame. Seedlings are moved into a cold frame as soon as possible to provide more growing space in my small greenhouse. Usually only those plants that need the warm temperature of the greenhouse stay there longer, like annuals, herbs, peppers, and tomatoes. But eventually, they too will be move outside to hardened off.

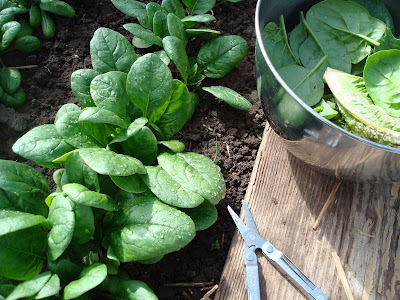
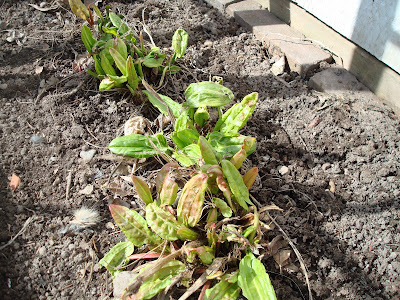
In the garden the spinach planted last fall was harvested for the Easter dinner table along with most of the rest of the parsnips. This years garlic crop is out of the ground and growing nicely as the pictures show and the sorrel has sprouted and soon will be on the menu. You will continue to note that we like lettuce and greens in this garden and on the table throughout the growing season.

We could use some rain as the ground is drying out and I really do not have time to rototill the garden this early in the season. I want to set up the rain barrels so that I can water the cold frame plants with rain water so I am hoping for rain to fill them.

Happy Gardening

Thursday, April 9, 2009

Cold Frame Plans - Part 2

Cold Frame pattern for 4 foot by 4 foot piece of plywood


Cold Frame Vent Stick


In Cold Frame Plans - Part 2
, you will find a list of materials to build the style of cold frame that I like to use. And in this post, you will also find the directions for constructing a cold frame.
Part 1 - which was posted first (or under this posting),, discusses the advantages of, and some methods for, using cold frames.

Materials for two 4 foot by 4 foot cold frames:
1 - 4 foot by 8 foot sheet of 1/2 inch plywood - exterior grade
(You can have the straight cuts made at the lumber yard, but will need some way to make the two diagonal cuts to finish this portion of the project)
4 - 1 by 3 inch 8 foot pine boards
4 - 1 by 2 inch 8 foot pine boards or a bundle of lath strips to secure covers
2 - 3 foot pieces of 18 gauge perforated angle steel
1 - 2 inch by 2 inch lumber made into a ventilation stick. Cut notches in a 2 foot piece and use the stick to prop the cold frame lid open to allow for ventilation.

Hardware:
8 - 4 inch metal L-brackets
4 or 6 - 3 1/2 inch hinges
50 - 1/4 inch 1 inch hex bolts, nuts and washers
2 simple handles help when moving the frame
Supply of wood or drywall screws for task (3/4 inch)
Assorted tools used to complete task - hacksaw, drill, some sort of saw for lumber, screwdriver, wrench, and hammer.

Cut your plywood to the desired dimensions from the pattern above. Cut the angle steel into four 7 1/2 inch pieces. Join the box with angle steel on the inside of the front and back panels with the bolts and nuts. Use the washers on the outside. Bolt the four sides together. The finished box dimensions will be 48 inches by 49 inches and the lid you make should be constructed with these measurements in mind. Before making the lid, flip the finished box so that the lid will fit flat on the cold frame. The procedure will cause the box to be at a slant when sitting on the ground and allow more light to penetrate at this angle.

Cut 2 each lid frame boards (1 inch by 3 inch stock) 46 1/2 inches and 47 1/2 inches. Arrange these pieces for a finished square of 49 inches by 50 inches. Attach the board with the L-brackets to the inside. Attach the hinges with one side on the lid and one side on the outside back of the cold frame box. Cut some scrap plywood or paneling into 8 inch squares and then cut them in half to make triangles to attach at the corners of the lid for strength when using plastic to cover the lid frame. I hope the pictures included help in your construction.

Once the lid is made, a variety of materials can be used to cover the cold frame. Plastics that are treated against UV rays will last longer than conventional plastic. Fiberglas is another useful covering but such materials will require additional stock purchases for securing this material to the lid. Even spun polyester row cover material can be used to cover the cold frame lid. Remember to think of the weather and the crops that will be in the cold frame as the determining factor in your choice of cover materials. Lighter materials will need a central support for winter use. One or two supports attached inside the lid will help these lighter materials in a winter environment when snow covers the cold frame lids.

I have never been without these vital garden tools and hope you too can add them to your garden this season.

Happy Gardening

Cold Frames as Season Extenders


A cold frame is basically a box sitting on the soil with a transparent lid that will extend the growing season both in fall and spring. These season extenders have traditionally been used in a variety of ways by gardeners. I use them to grow greens, lettuce, and other cool weather crops throughout the year. These plans are for two frames from one piece of plywood and I have four frames in the garden this season - two for transplants and two for greens and lettuce.

Cold frames affect temperature by producing a micro-climate. This can be easily 10 to 20 degrees warmer than outside the box. The structure is commonly used to condition plants in a sheltered environment so they can then be moved to a permanent location. Season extenders can also be used to protect tender plants in the winter. The cold frame sits directly on the soil and the transparent lid should have the best south facing location possible. The sun will warm the soil and the plants and the absorbed heat will slowly be given off during the night. The nature of the sides and cover will help determine the heat retention of the enclosure. Because the lid is hinged this will allow easy access to the soil and a way to manage the temperature in the frame. Ventilation by lifting the lid is the most common way to manage the internal temperature of the cold frame. Some gardeners use temperature activated lift mechanisms to maintain the internal temperature but this can add to the total cost of the structure. The addition of foam insulation around the side of the cold frame can add to the heat retention, and some foam is foil backed which would add a reflective quality to the insulating.

The use of night covers can also promote a more favorable growing environment. However, such covers need to be easy to remove, should not absorb water, and be attached to make them windproof. These covers will need to be remove each day to allow for maximum light penetrating into the cold frames.

Cold frames affect moisture. High humidity helps protect plants from the effects of cold weather. Plus, spring and fall rains do not then drench to soil or pound young plants. However, the gardener will have to control the water provided to plants in these season extenders. The humid environment of the cold frame can soon turn into a desert if soil moisture is not managed. Hand watering is easily a trade off for more vegetables for a longer time. Additionally these structures also protect plants from wind. A wind chill factor will affect plants by removing heat and moisture. Plants in cold frames are protected from this fluctuation in their environment and as a result avoid this stress.

Cold frames can be purchased or built from a variety of materials. However, a word of caution about home built frames. Glass is not suggested in the construction of cold frames in our Wisconsin environment. Old storm windows are often used in cold frame construction, but they can easily shatter from heavy ice and snow creating a hazardous situation in the garden. There are many types of fiberglass and plastics that are a reliable substitute. Some materials can be purchased that are resistant to ultraviolet rays of the sun. Plastics are especially vulnerable to UV rays and will, in time, become quite brittle

The following post will have plans and measurements for home built cold frames.

Happy Gardening

Sunday, April 5, 2009

Pests, Critters and Planning Ahead


Critters and pests always seem to be lurking on the edge of our garden happiness. This week several came to my attention.

Rabbits are a constant threat to a gardener's happiness, and with my crocus blooming, I was aware that they are potential bunny food. Dusting the buds, leaves, and the open flowers with Cayenne pepper is one way to stop hungry rabbits. However this week another old nemesis reappeared and did a number on the crocus flowers as the pictures indicate. The Purple House Finch is a flower and bud eater and all the cayenne pepper you want to douse the crocus with will not prevent the bird from eating the stamens and lower ends of the flowers as the photos indicate. After several clumps succumbed to this invasive species, I put some flash tape on a bamboo stake to frighten them away. Keeping them out of the apple buds and blossom will be another battle but I will try the flash tape there only when the buds are real close to breaking.

Rabbit damage is everywhere on shrubs and bushes. One must be ever vigilant in the early winter to the potential damage that rabbits can do. The photo examples show how heavily they have eaten the bark and on one tree, they even came back after all the snow was melted and ate bark again. The very best way to prevent this sort of damage is to cage all your plants with chicken wire and continue to keep the wire higher than the snow so bunnies can't get into the caged areas and feed. The other way is to remove as many rabbits from your garden environment as possible. The way you do that is your choice, however do not make your rabbits a burden to another homeowner or gardener.

The apple trees are, or should be, pruned. With warmer days and nights, the time is correct for the application of dormant oil sprays. At one time this was an annual event for my fruit trees but research has shown that this spray application may do more harm than good, as the spray kills both pests and beneficial insects. Unless you have had mite infestations on your fruit trees or can identify potential colonies of mites on your trees, most Extension offices are not recommending this spray. I have not sprayed dormant oil for the last three years and have had little of no mite damage. Using the spray on ornamental trees and shrubs that have scale infestations is still recommended but just not on fruit trees. An added note - the pruning from the apple will make good pea stakes for that crop; or you can find some other pruning materials like the ones pictured that you can use for the pea vines to climb. I like to use these kind of sticks because when the harvest is done I can gather vines and sticks and remove the whole planting easily.

The picture posts included this week show the lettuce, onions, and micro-green trays sprouted. Some thinning of the lettuce will be needed but the rest will grow in their containers getting ready for transplanting in the garden.

Early this week, I hope to post the supply list and measurements for a 4 foot by 4 foot cold frame and a brief set of directions for building those season extenders. One of the frames in my garden will be moved closer to the house so I can use the space for hardening off my transplants from the greenhouse which will be happening soon.

Happy Gardening